")
Windows 11 usually detects every new hardware as soon as you connect them. Once it detects a hardware change, it automatically installs the required drivers and lets you use it without any modification.
This functionality of Windows works most of the time, but sometimes, it may require manual selection to scan for hardware changes. So, when Windows doesn’t recognize the connected device; you are required to scan for hardware changes.
Restarting the Windows PC seems the quickest way to scan for hardware changes, but not everyone can restart the device at any given time. So, what are the remaining options to scan for hardware changes without restarting?
How to Scan for Hardware Changes on Windows
Well, there are quite a few ways to run a scan to detect hardware changes on Windows. You can use the Device Manager, Computer Management Tool, or Command Prompt to scan for connected hardware devices. Below, we have shared different ways to run a scan to detect hardware changes on Windows. Let’s check out.
1. Scan for Hardware Changes via Device Manager
Device Manager seems to be the easiest way to scan for hardware changes. Here’s how you can use the Device Manager to scan for hardware changes on Windows.
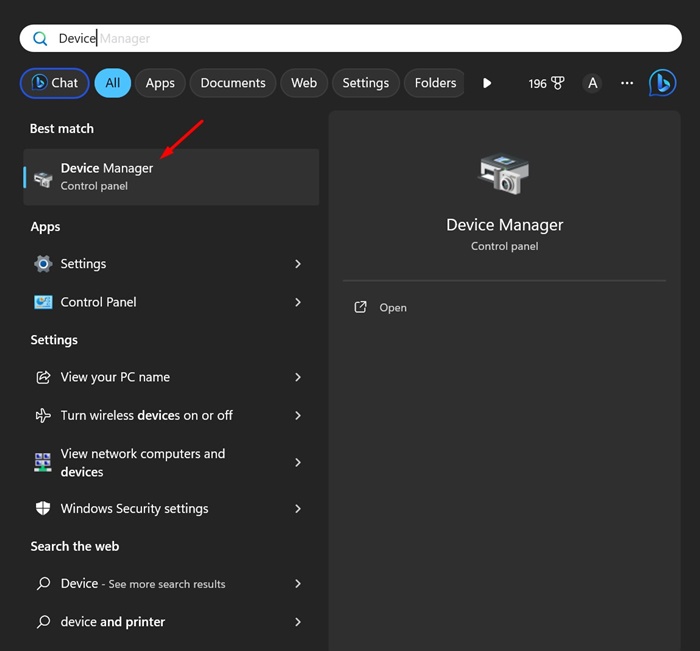
1. Type in Device Manager on the Windows 11 Search. Next, open the Device Manager Control Panel item from the list of best-match results.
2. When the Device Manager opens, right-click the Device Category and select Scan for hardware changes.

3. If you aren’t sure about the Device Category, click on the Action menu and select Scan for hardware changes.

That’s it! This is how you can run a scan to detect hardware changes via Device Manager.
2. Scan for Hardware Changes from the Computer Management Tool
The Computer Management utility of Windows also has the Device Manager; hence, you can use the Computer Management tool as well to scan for hardware changes. Here’s how to scan for hardware changes from the computer management tool.
1. Type in Computer Management on the Windows 11 Search. Next, open the Computer Management tool from the list of best-match results.

2. When the Computer Management opens, navigate to the System Tools > Device Manager.

3. Now select the device category.
4. On the right side, click Action and then select Scan for hardware changes.

That’s it! This is how you can run a scan to detect hardware changes on Windows via the Computer Management tool.
3. Scan for Hardware Changes via Command Prompt
Command Prompt is a great command line utility that can perform many complicated tasks. You can use the Command Prompt utility to scan for hardware changes on Windows 11. Here’s how to use it.
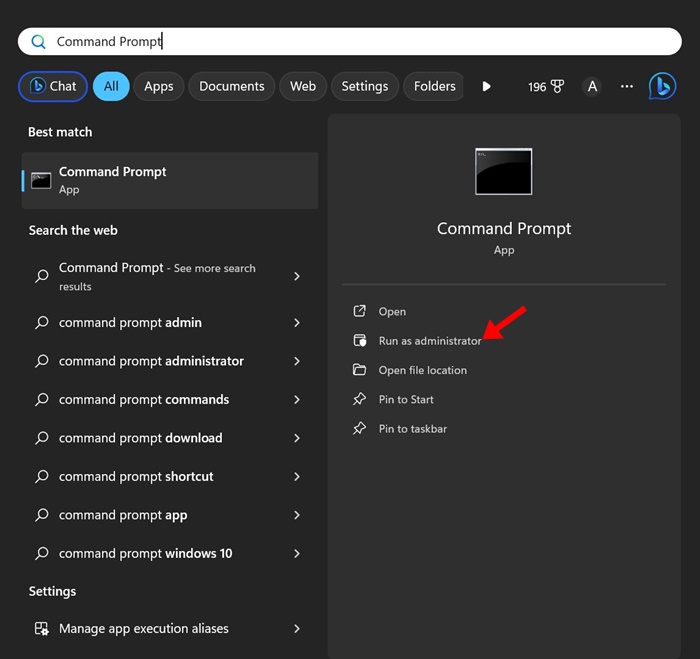
1. Type in Command Prompt on the Windows 11 Search. Next, right click on the Command Prompt and select Run as administrator.
2. When the Command Prompt opens, execute this given command:
pnputil.exe /scan-devices

3. You will see the ‘Scanning for device hardware changes’ message once you execute the command. This confirms that Windows is scanning for hardware changes.

That’s it! Once you see the ‘Scan Complete‘ message, close the Command Prompt.
4. Create a desktop shortcut to scan for hardware changes
Not everyone may be comfortable handling the Device Manager, Computer Management tool, or Command Prompt. For them, it’s best to have a desktop shortcut allowing to scan for hardware changes.
A desktop shortcut will allow you to run a scan to detect hardware changes whenever you want without going through Device Manager, the Computer Management tool, or the Command Prompt. Here’s how to create a desktop shortcut to run the scan devices command.
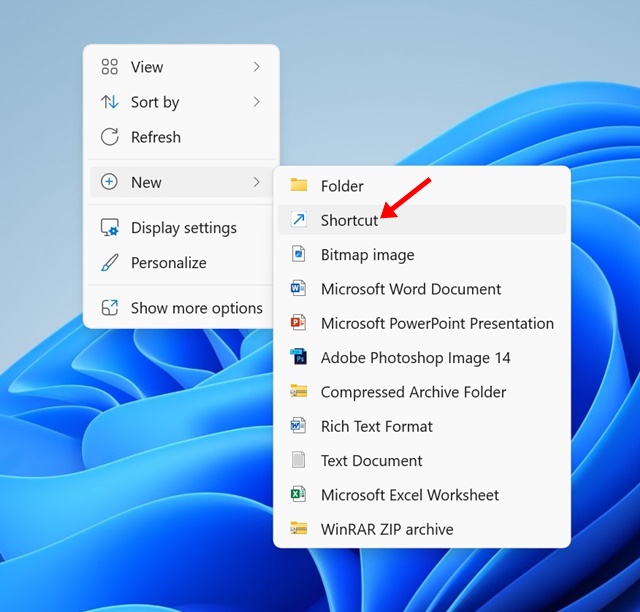
1. Right-click on an empty area on your desktop screen and select New > Shortcut.
2. On the Type the location of the item field, paste the given location and click Next.
C:\Windows\System32\cmd.exe /k pnputil.exe /scan-devices

3. On the name this shortcut Window, type Scan for Hardware Changes and click Finish.

4. Now, right-click on the desktop shortcut and select Properties.

5. Switch to the Shortcut tab and click Advanced.

6. On the Advanced Properties, check the Run as administrator and click OK.

7. After making the changes, click Apply to close the open Window.
That’s it! Now, whenever you want to scan for hardware changes, double-click on the desktop shortcut you’ve created.
So, these are the few easy methods to run a scan to detect hardware changes on Windows 11. Although we have used a Windows 11 device to demonstrate the steps, the same steps will work on Windows 10 as well. Let us know if you need more help running a scan to detect hardware changes in the comments below.
Also Read: How to Update Audio Drivers in Windows 11

