")
You get more backup & recovery options on Windows 11 than any other desktop operating system. The System Restore tool lets you roll back your operating system to a previous working state. The feature is very helpful but needs manual activation.
Other than the System Restore, you can uninstall the recent Windows updates or Factory reset your PC. Both Factory Reset and Uninstalling the Windows updates won’t delete your files but will resolve all PC problems.
However, the only drawback is that these features will work only if you can boot into your PC. And certain types of Windows problems can prevent you from booting into your computer. So, it’s best to create a Windows 11 Recovery Drive for emergency purposes.
What is Windows Recovery Drive?
Windows Recovery Drive is a feature that allows you to reinstall Windows 11. It’s a good idea to create a recovery drive in Windows.
That way, if your PC ever experiences major issues such as system file corruption or hardware failure, you can use the recovery drive to reinstall Windows 11.
So, if you often face data loss issues due to Windows 11 PC being unable to boot, creating a recovery or backup plan would be very helpful. The Windows 11 USB Recovery drive lets you boot to Windows Recovery Environment (WinRE).
Once you enter the WinRE, you can access the troubleshooting options to find and fix the problems preventing the boot.
How to Create a Recovery Drive USB?
You don’t need to install any third-party tool to create a Recovery drive on Windows 11. There’s a built-in app available on Windows for this purpose. Follow our shared steps to create a Windows recovery usb.
1. Plug an empty USB drive into your computer.
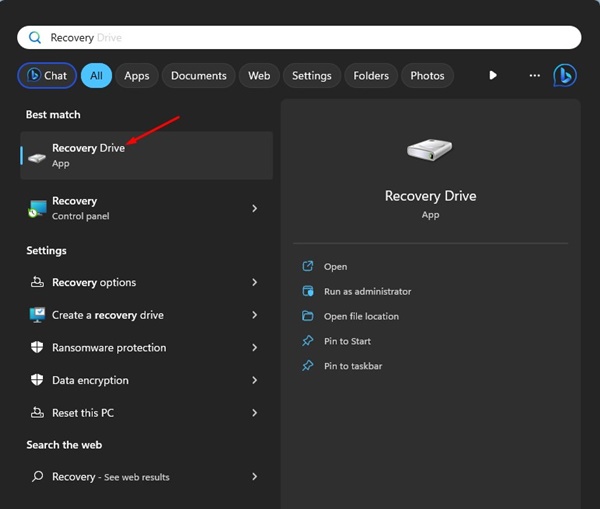
1. Click on Windows Search and type Recovery Drive. Now open the Recovery Drive app from the Best Match results.
2. Now, you will see a UAC prompt. Simply click on the Yes button.
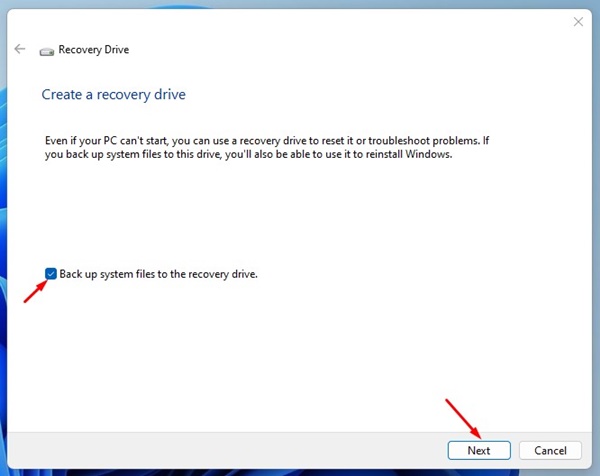
3. On the Create a Recovery Drive prompt, check the Backup system files to the recovery drive and click the Next button.
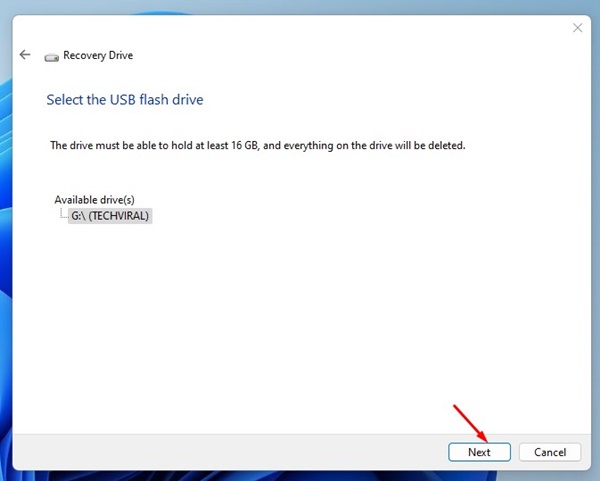
4. Select the USB Flash Drive prompt, and select the correct USB flash drive you want to use as a Recovery drive.
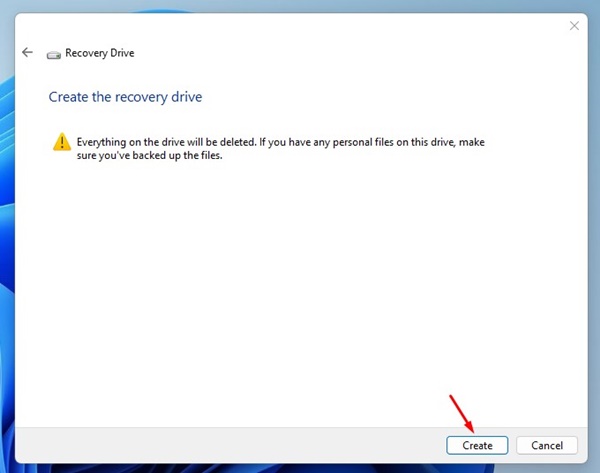
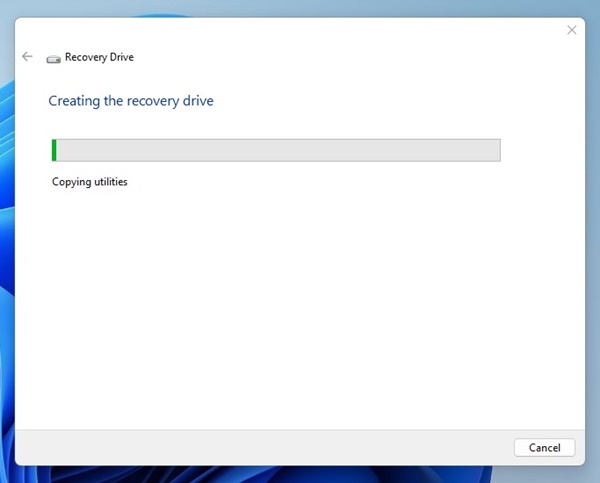
5. Now, you will see a warning screen letting you know that the process will delete all files stored on the USB flash drive. So, back up your personal files in any other location. Once done, click on the Create button.
6. Now, you need to wait until Windows 11 creates a Windows 11 Bootable Recovery Drive. Once done, you will see the success message; click the Finish button.
That’s it! That’s how easy it is to create a recovery USB drive on Windows 11 using the windows recovery tool.
How to Use Recovery Drive for Windows Recovery
Now that you have created a USB Recovery drive on Windows 11, you can use it whenever your device fails to boot. Here’s how to use a recovery drive in Windows 11.
1. Connect the Recovery drive to your computer. Power on your computer and press the Boot Menu key. If you don’t know the key to access the boot devices menu, check out the table below.
| Laptop/Desktop Brand | Boot Menu Key Shortcut |
|---|---|
| ASUS | F8 |
| Dell | F12 |
| Acer | F12 |
| HP | F9 |
| ASRock | F8, F11 |
| Lenovo | F8, F10, F12 |
| Gigabyte | F12 |
| Biostar | F9 |
| ASRock | F8, F11 |
| Intel | F10 |
| MSI | F11 |
2. Once you access the Boot Device Menu, you must use the arrow key to select your USB Recovery Drive. Once selected, press Enter to boot using the recovery drive.
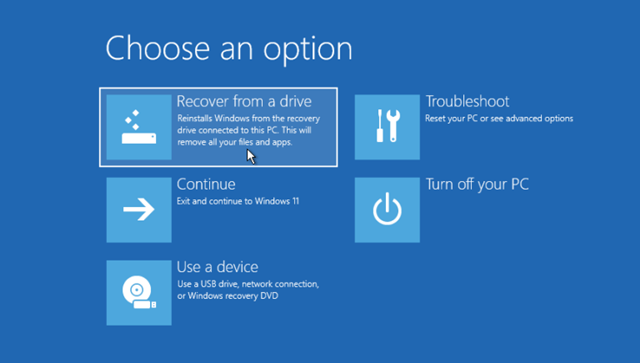
3. Now, wait for a few minutes for your device to boot from your USB drive. Once booted, pick the language and select Recover from a drive.
4. On the next screen, select Recover from a drive.
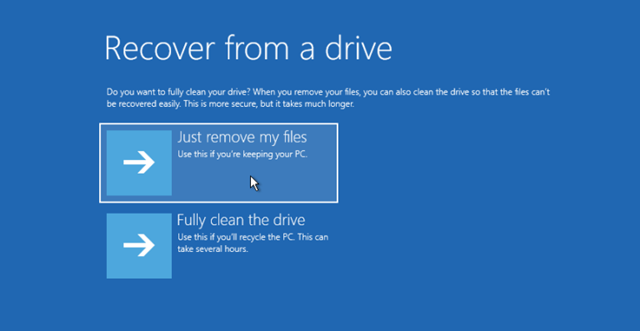
5. Now, you will be asked whether you want to remove your files or fully clean the drive. Pick the Just Remove My Files option.
6. On the Recover from a drive screen, click the Recover button.
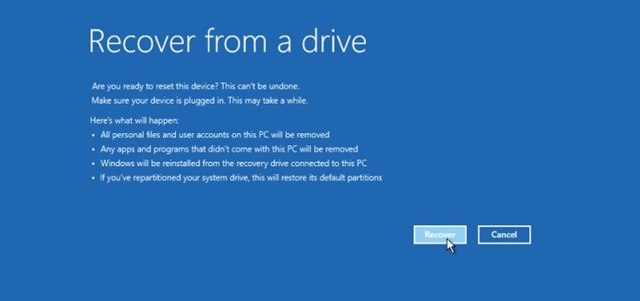
7. This will start the Windows 11 reinstallation process. Once done, you must set up your preferences to use your Windows 11 computer.
That’s it! That’s how easy it is to use a recovery drive on Windows 11 computer.
Fix ‘We Can’t Create a Recovery Drive’ Error
While creating a Recovery Drive in Windows 11, you may encounter an error that reads, ‘We Can’t create a recovery drive’. If you see this error, don’t panic.
Most of the time, the error appears due to an incorrect USB drive format. Sometimes, antivirus programs or certain third-party tools can prevent Windows 11 from creating a Recovery drive.
Generally, a restart fixes the error, but if it doesn’t, you can try doing the things we have mentioned below:
- Restart the Recovery Drive App from the Task Manager.
- Format the USB drive in the FAT32 file system.
- Disable the third-party antimalware tools.
- Disable the virtualization programs.
- Delete the Windows.old folder from your device.
- Run the SFC and DISM Scan using the Command Prompt.
- Update Your Windows Operating System.
You can try doing these things to resolve the ‘We Can’t Create a Recovery Drive’ error on Windows 11 computer.
Other Ways to Create Windows 11 Backup
Well, this is not a part of the Windows USB recovery drive tutorial, but it’s a helpful feature we think you should be aware of.
The recovery drive is designed to reset your system to a new one. On the Recovery drive, all your system files will be refreshed with new ones, and you will get a stock operating system experience.
The system Image backup is just another recovery option available on Windows. The only difference is that System Image backup creates an image of your entire Windows OS, including your personal files and application.
So, basically, in the time of a critical crash, a system image backup will restore the system to the state of its creation date. You won’t lose your personal files, programs, settings, etc.
How to Create a System Image Backup on Windows?
To create a system image backup on Windows, follow some of the simple steps we have shared below. Here’s what you need to do.
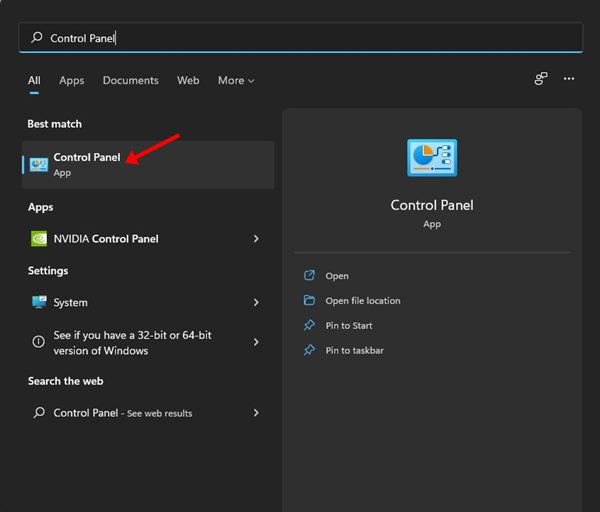
1. Click on Windows 11 search and type Control Panel. Next, open the Control Panel app from the list of best match results.
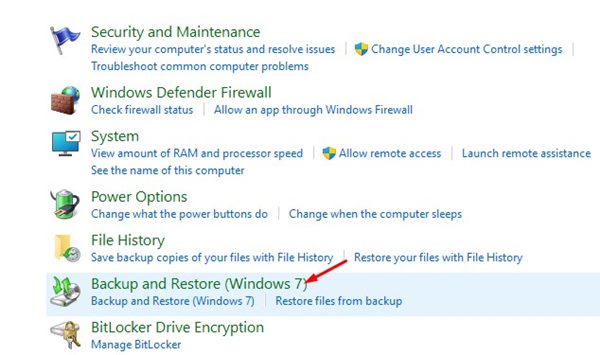
2. When the Control Panel opens, select the Backup and Restore (Windows 7) option.
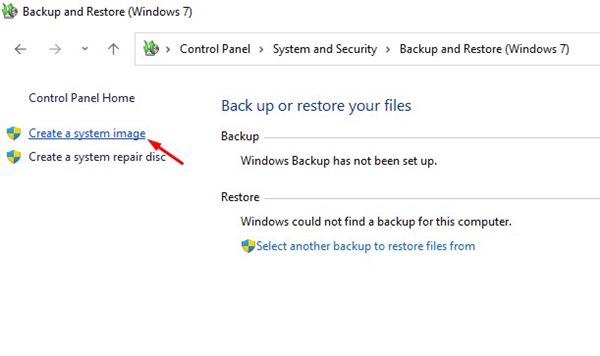
3. On the Backup and Restore, click Create a system image on the left pane.
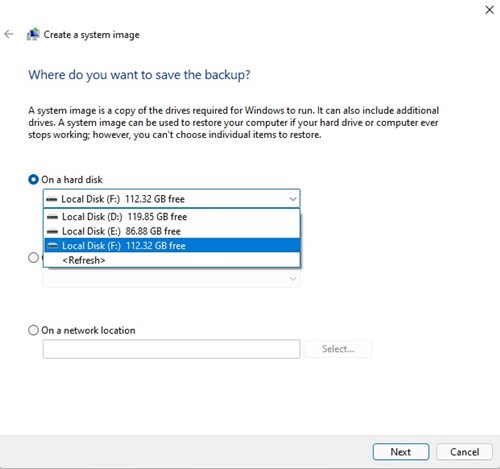
4. Now, on the Create a System image prompt, select where do you want to save the backup. You can choose to save the backup on an external drive, DVD, or network location. Make your selection and click on the Next button.
5. Now, you will be asked to confirm which partitions of your hard drive will be included in the image backup file. Select the partitions and click on Start Backup.
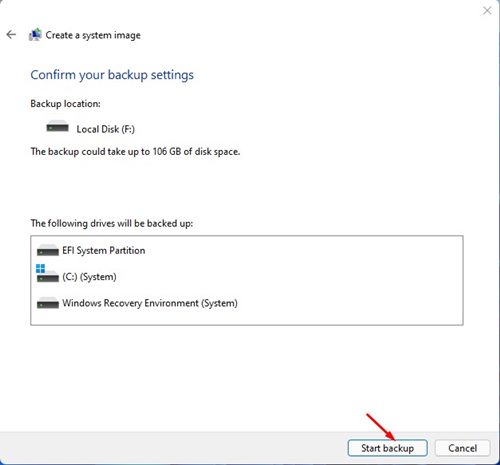
That’s it! You must follow the on-screen instructions to complete the system image backup process. This is how you can create a system image backup file on Windows 11 computer.
Restore Windows 11 with System Image Backup?
Now that you already have the System Image Backup, you can use it whenever needed. Here are the steps to restore Windows 11 with system image backup.
- Click on the Windows Start button and select Settings.
- On Settings, navigate to Update & Security > Recovery.
- On the Recovery options, click the Restart Now button beside Advanced Startup.
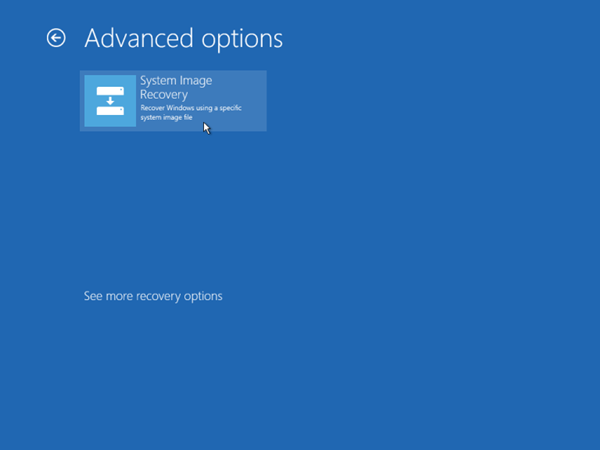
- Now on the Choose an option window, navigate to the Troubleshoot > Advanced Options > System Image Recovery.
- Now select See More Recovery options and then select System Image Recovery.
- At this point, Windows should detect the system image backup file. If it doesn’t, click Select a system image and select the image.
- Once selected, click on the Next button and follow the on-screen instructions.
These are the steps to restore Windows 11 to its previous state. The system Image backup option works best when your PC doesn’t boots.
Using Windows File History to Backup Windows 11 Data
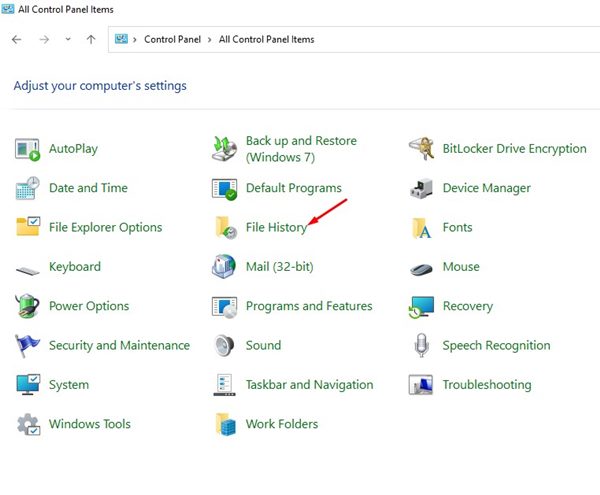
Windows File History is another backup & restore option on Windows 11. It’s not a backup & restore tool and can’t back up entire drives. It takes a snapshot of only important folders such as Documents, Videos, Pictures, or offline OneDrive files.
So, if you want a basic backup & restore option that works only with certain files & folders, File History might be your best pick. We have shared a detailed guide on how to use Windows File History to back up your Windows 11 Data.
Make sure to go through that guide and configure the File History. During the configuration, you can select the folders or files you want the File History to backup.
Use Third-Party Tools to Backup & Restore Windows
Several third-party software are available for Windows that provide backup & restore options. You can use them to have more control over what to include & exclude in the backup.
Third-party disk image softwares can back up your entire HDD/SSD in just a few minutes. However, most of these software are premium and require access to cloud storage.
Some of the best disk image software are Acronis True Image, EaseUSTodo Backup, etc. Honestly, third-party backup & restore utility is not needed in Windows 11 because the built-in tools are usually enough.
So, this is a detailed guide on how to create a recovery drive usb. We have also discussed other recovery options available on Windows 11. So, use these tools and create a backup plan ready and use it in need.


