
")
Do you like watching YouTube movies? Properly, this isn’t a query you’d ask somebody immediately. Nearly everybody with a smartphone/laptop and entry to the web watches not less than 5 to 10 movies on YouTube every single day.
YouTube is a free platform that permits customers to stream countless hours of video content material. Whereas the platform is generally bug-free, sure issues would possibly forestall you from binge-watching your favourite exhibits on YouTube.
One such problem is YouTube Audio Stuttering within the Chrome browser, which may break your video-watching expertise. So, in case you are experiencing unstable or stuttering audio on YouTube, don’t panic, as you’ll be able to repair the issue in a short time.
8 Greatest Methods to Repair YouTube Audio Stuttering in Chrome on Home windows
Therefore, this text will share among the greatest strategies to repair the YouTube Audio Stuttering problem within the Chrome browser on Home windows. So, let’s get began.
1) Mute and Unmute the Youtube Tab
Typically, muting and unmuting the problematic YouTube tab appears to repair the issue. You’ll be able to mute and unmute a YouTube tab to resolve the audio stuttering problem.
1. Initially, open your Favourite internet browser and head to YouTube.com.
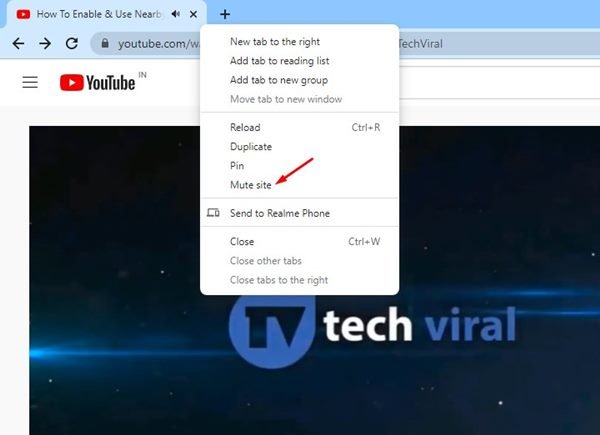
2. On the YouTube web site, open the video. If the audio is stuttering, right-click on the Tab and choose the Mute website choice.
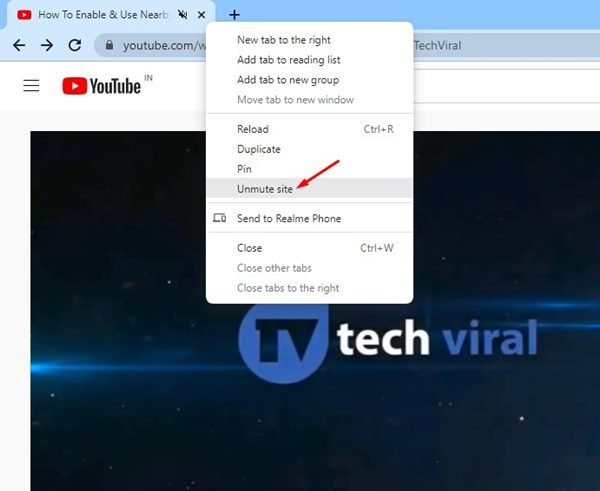
3. To unmute the positioning, right-click on the Tab as soon as once more and choose Unmute website.
That’s it! You’re accomplished. That is how one can mute and unmute the YouTube tab to repair the audio stuttering problem in Chrome.
2) Restart YouTube
If the YouTube audio remains to be stuttering, you should restart the YouTube. Typically, this drawback happens on account of problematic cache and cookies. Therefore, you should proceed your YouTube tab to determine a brand new audio connection to repair the audio stuttering drawback.
To restart YouTube within the Chrome browser, shut the Tab the place YouTube is open and re-open it. If you wish to improve the likelihood of fixing the YouTube Audio Stuttering problem, you’ll be able to restart the online browser.
3) Attempt Taking part in YouTube movies in a special browser
Despite the fact that you don’t wish to use a special internet browser apart from Chrome, it’s suggested to change your internet browser and play a YouTube video quickly.
This may show you how to confirm whether or not you could have an issue with the YouTube or the online browser. If the audio stuttering on YouTube movies doesn’t seem on different internet browsers, Chrome is the wrongdoer right here.
So, you should troubleshoot the browser-related points to repair the YouTube audio stuttering problem.
4) Block or Take away Extensions
Typically third-party extensions that you just set up through the Chrome internet retailer interferes with the workings of YouTube, which results in video lagging or YouTube Audio Stuttering problem.

Open the chrome://extensions/ web page in your Chrome browser and overview the extensions. You must pay shut consideration to the extensions which have entry to all internet pages and are related to video/audio playback.
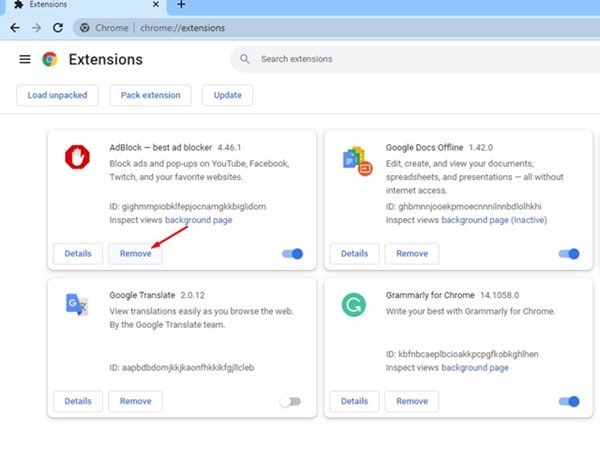
In case you discover any shady extensions on the record, it’s greatest to take away them. In case you don’t wish to take away any extension, open a brand new Incognito tab and play a YouTube video. The attachments weren’t allowed to run on the Chrome Incognito mode till you allow them.
5) Disable the {Hardware} Acceleration in Chrome
For many who don’t know, the {Hardware} Acceleration function of Chrome places hundreds in your GPU to enhance the video playback high quality and efficiency. Nevertheless, in case your PC lacks a strong GPU, it could create video lags or audio stuttering issues. Therefore, it’s greatest to disable the function and test quickly.
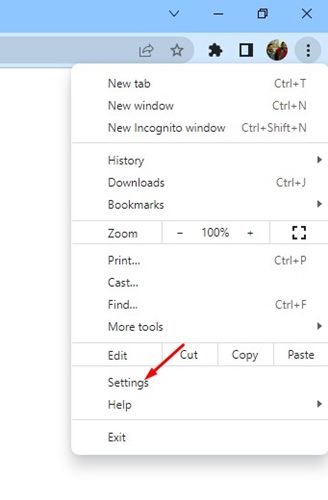
1. First, click on on the three dots within the top-right nook.
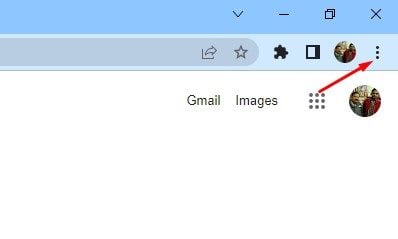
2. From the record of choices, click on on Settings.
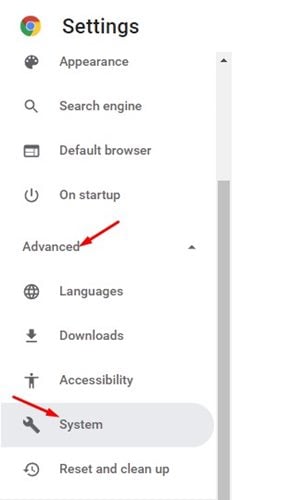
3. On the Settings web page, increase the Superior part and choose System.
4. On the System web page, toggle off the Use {hardware} acceleration when accessible swap.
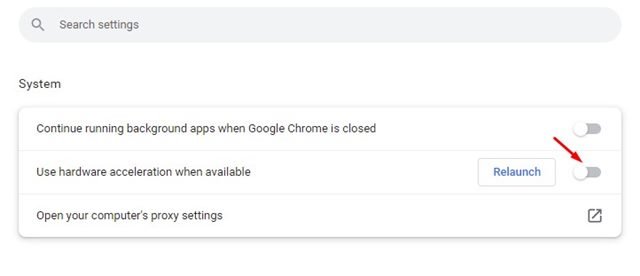
That’s it! You’re accomplished. After making the adjustments, restart your internet browser and play a YouTube video. The audio gained’t stutter anymore.
6) Replace the Audio Driver on Home windows
If the YouTube audio remains to be stuttering even after making use of all browser-based fastened, you should troubleshoot audio-related issues in your PC. The very first thing that it is best to do is replace the audio driver.
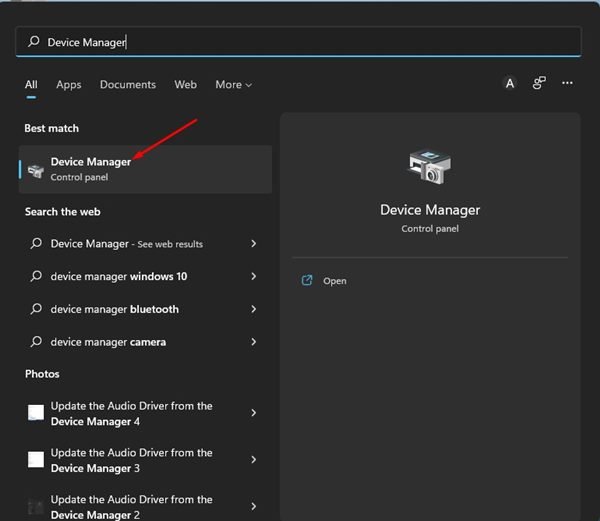
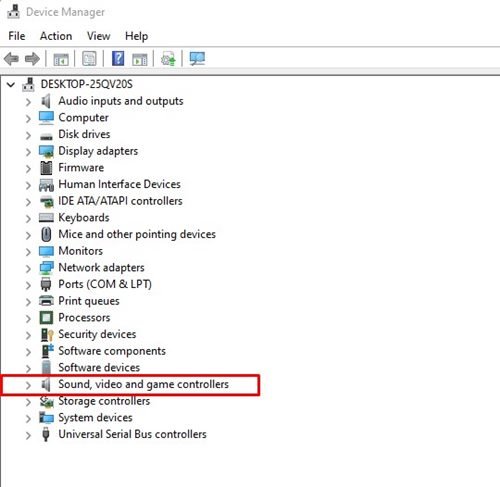
1. First, click on on the Home windows Search and sort in Gadget Supervisor. Subsequent, open the Gadget Supervisor app from the record.
2. On the Gadget Supervisor, increase the Sound, video, and sport controllers choice.
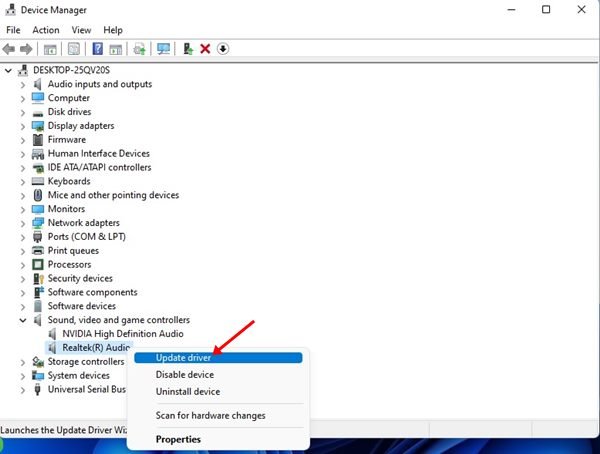
3. Now, right-click on the Sound driver and choose the Replace driver choice.
4. On the following display, you will notice two selections. Choose Search Robotically for Drivers.
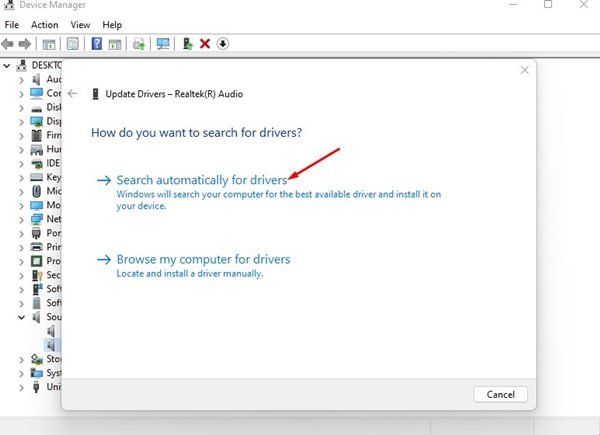
That’s it! You’re accomplished. Now comply with the on-screen directions to put in the most recent model of the Audio driver. As soon as up to date, restart your PC and take a look at your YouTube audio once more.
7) Disable the Audio Enhancements on Home windows
Each Home windows 10 and Home windows 11 give you an audio customization choice known as Audio Enhancements. Though more often than not, the Audio Enhancements on Home windows enhance the audio high quality, typically it additionally triggers issues whereas enjoying audio on-line. Therefore, in case you have enabled audio enhancements, it’s greatest to disable the function and test.
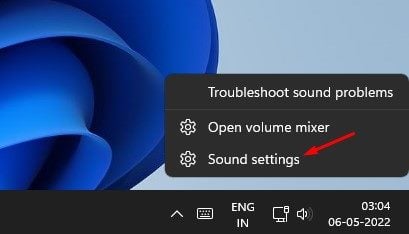
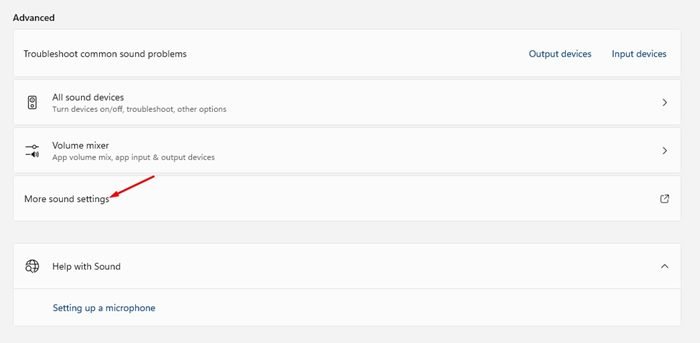
1. First, right-click on the speaker on the taskbar and choose Sound Settings.
2. On the Sound settings web page, scroll down and click on on the Extra Sound Settings choice.
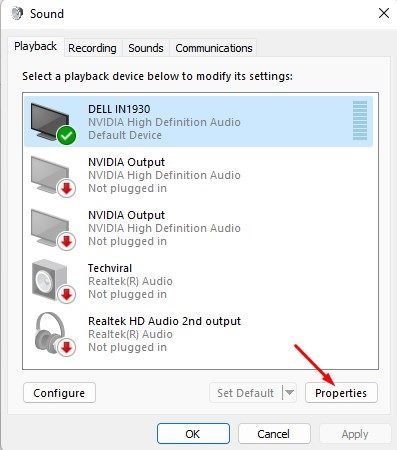
3. On the Sound Window, choose the speaker and click on on the Properties.
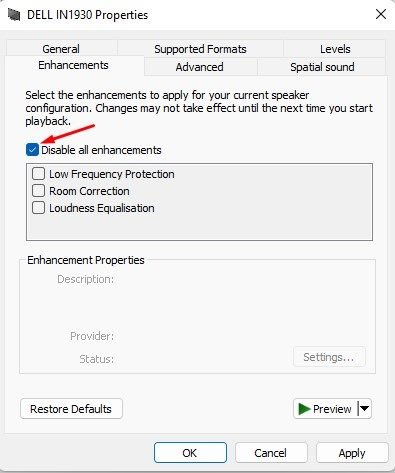
4. On the Speaker Properties, swap to the Enhancements tab and test the Disable all enhancements.
5. As soon as accomplished, click on on the Apply button after which on Okay.
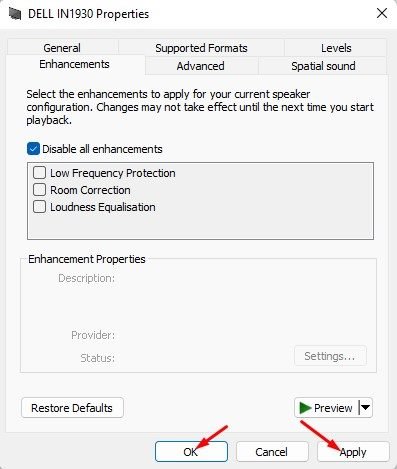
That’s it! You’re accomplished. After disabling the audio enhancement, be certain that to restart your laptop. After the restart, play the YouTube video; the audio stutter problem is more likely to be fastened.
8) Run the Audio Troubleshooter
If disabling the audio enhancement doesn’t give you the results you want, you should do this technique. Right here we are going to run the Audio Troubleshooter to search out and repair present audio-related issues on Home windows PC. Right here’s how one can run Audio Troubleshooter in Home windows 11.
1. Initially, click on on the Home windows 11 Begin menu and choose Settings.
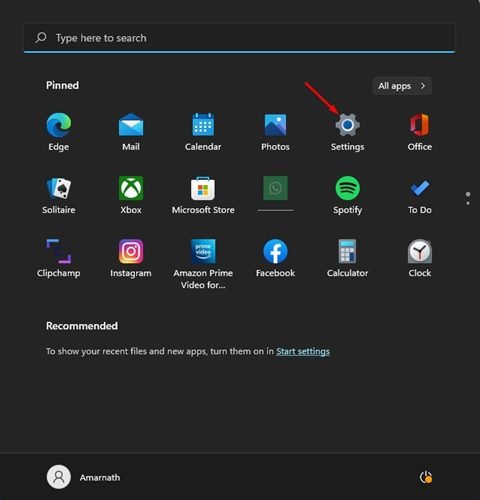
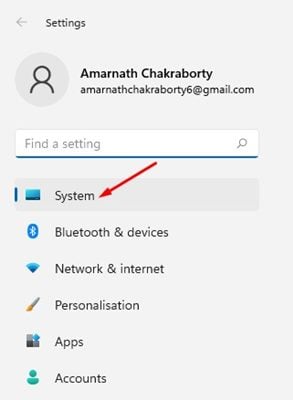
2. On the Settings app, click on on the System tab on the left pane.
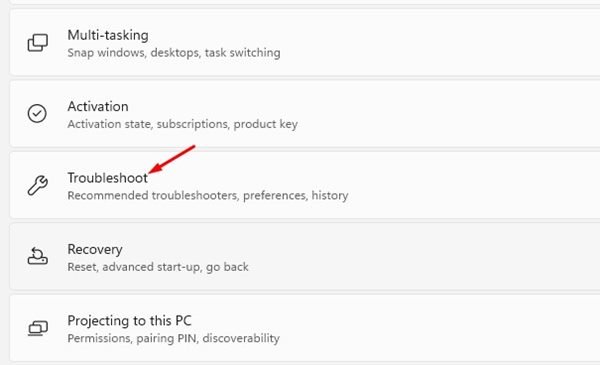
3. On the suitable, click on on the Troubleshoot choice as proven beneath.
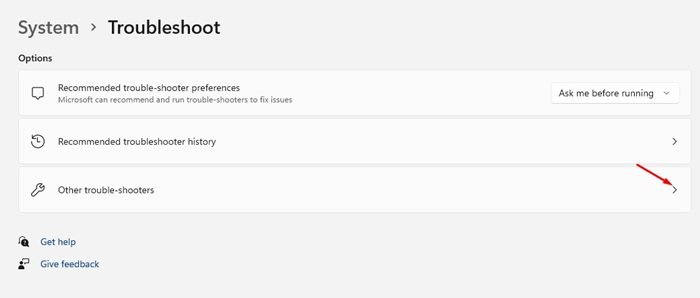
4. On the following display, choose the Different trouble-shooters.
5. Now click on on the Run button behind the Taking part in Audio.
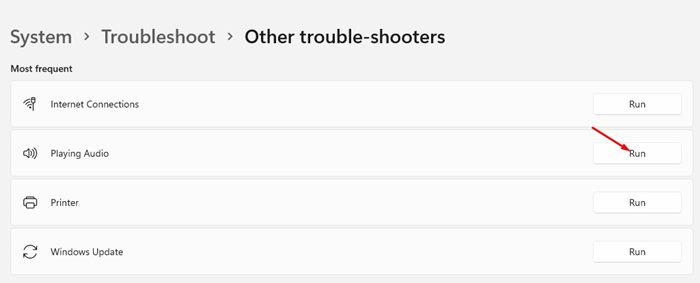
This may run the Audio troubleshooter in your Home windows 11 PC. You must comply with the on-screen directions to finish the method. The troubleshooter will take time to search out and repair the issue.
So, these are the few greatest methods to repair YouTube Audio Stuttering in Chrome for Home windows 10 and Home windows 11. These easy strategies would repair most audio-related points in your laptop, not solely audio stutter. We’re positive that these strategies will assist you choose the audio-related issues.


