
File Explorer on Windows 11 has received a major upgrade. The new file explore has better-looking icons, a more streamlined UI for the address bar, etc. While the new file explorer is great, many users face problems with it.
Recently, a few Windows 11 users have complained about the File Explorer Left Pane Missing issue. Users claimed that File Explorer is missing the left pane on the Windows 11/10 computer.
The left pane of File Explorer is very useful and provides quick access to the Network, drive partitions, connected drives, etc. If you are very used to the File Explorer’s left pane, finding it missing could be problematic.
How to Fix File Explorer Left Pane Missing in Windows
However, the good thing is that File Explorer left pane missing in Windows 10/11 is a problem that can be easily fixed. In this article, we will particularly discuss the troubleshooting tips for fixing the File Explorer left pane missing problem. Let’s get started.
1. Restart your Computer
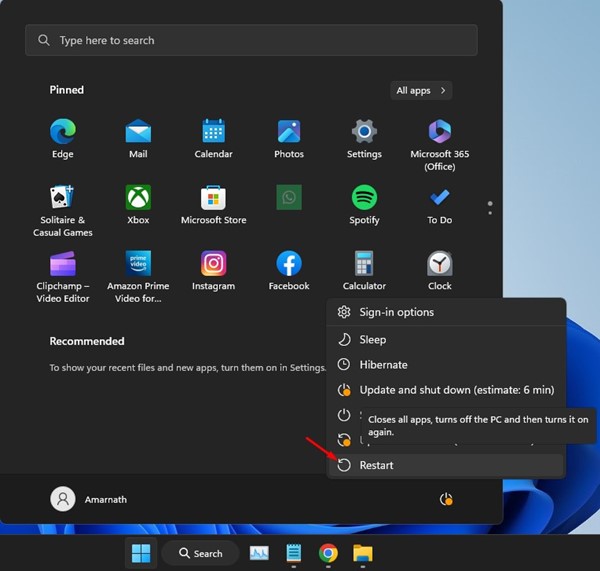
If you haven’t modified the Settings of Navigation pane, you need to restart your computer. The File Explorer Left Pane can fail to appear due to bugs & glitches.
And the best way to eliminate such bugs & glitches on Windows is to restart the device. Click on the Windows Start Button > Power Menu & select Restart.
After the restart, open the File Explorer; the left pane should appear now.
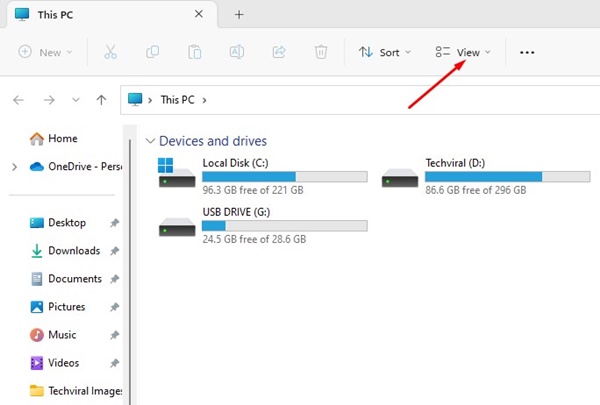
If restarting Windows didn’t help, you might have accidentally disabled the Navigation Pane on Windows. Hence, you must enable the Navigation Pane to fix the File Explorer Left Pane Missing issue. Here’s what you need to do.
1. Open the File Explorer on your computer. You can press the Windows Key + E button to open it.
2. When the File Explorer opens, click the View icon at the top.
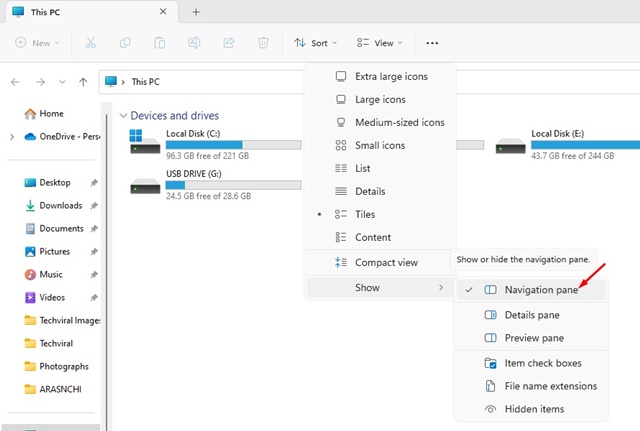
3. On the menu that appears, select Show > Navigation Pane. You need to make sure that the Navigation Pane is enabled.
That’s it! After making the changes, restart your Windows computer.
3. Restart the Windows Explorer
Windows Explorer process is responsible for handling various graphical elements of Windows. If this process is not responding, the left pane of File Explorer can go missing.
You can restart the Windows Explorer process from the Task Manager to fix all Windows Explorer related problems. Here’s how to restart the Windows Explorer.
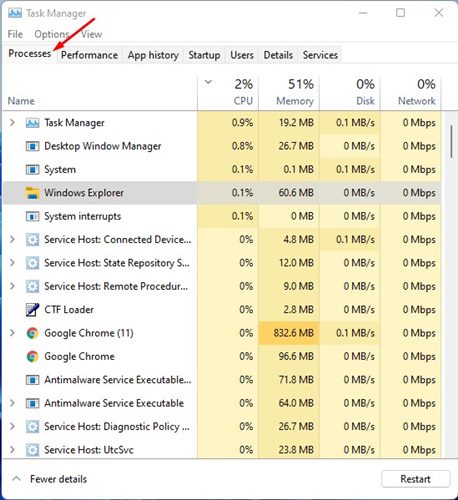
1. Type Task Manager on the Windows Search. Now open the Task Manager app from the list of best match results.
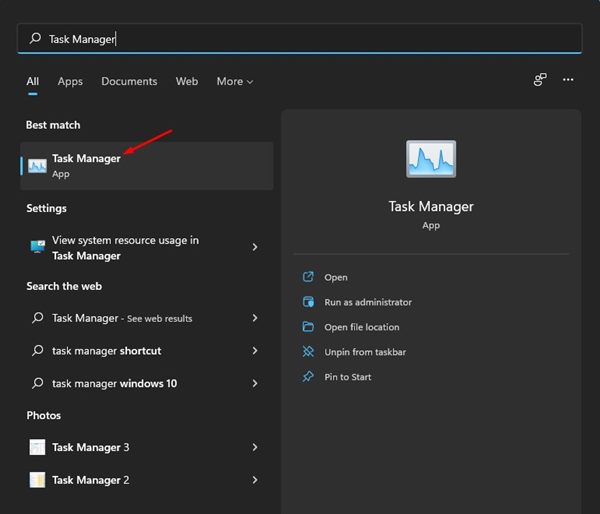
2. When the Task Manager opens, switch to the Processes tab.
3. Right click on the Windows Explorer & select Restart. Or else, select Windows Explorer and select Restart at the bottom left.
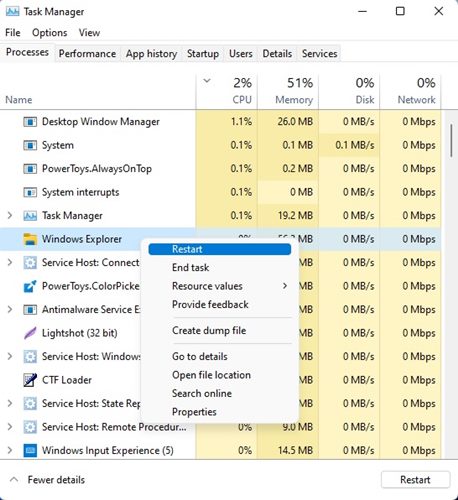
That’s it! This will immediately restart the Windows Explorer process & fix the File Explorer left pane missing issue.
4. Clear the File Explorer History
Since the problem is related to the File Explorer, clearing the File Explorer History may help. Clearing the File Explorer history has helped many Windows users fix the missing left pane problem. Here’s how to clear the File Explorer history.
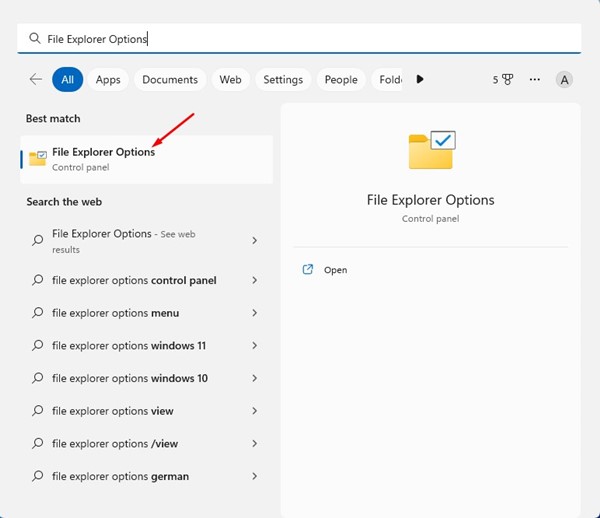
1. Type File Explorer Options on Windows Search. Next, open the File Explorer Options from the list of Best match results.
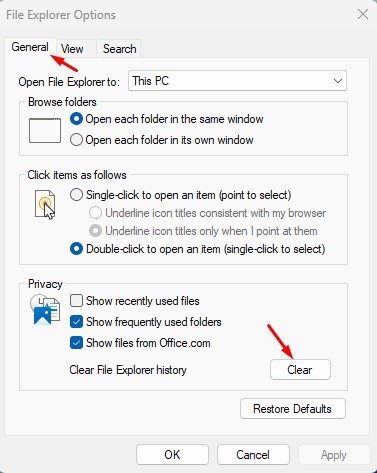
2. Switch to the General tab When the File Explorer Options opens.
3. Click on the Clear button beside Clear File Explorer history. Once done, click on the OK Button.
That’s it! You are done. Make sure to restart your Windows PC to apply the changes.
5. Re-register the shdocvw.dll
Shdocvw.dll or Shell Doc Object and Control Library is not directly linked with the File Explorer, but re-registering its DLL file has helped many users fix File Explorer left pane missing problem. So, you can try re-registering it as well. Here’s what you need to do.
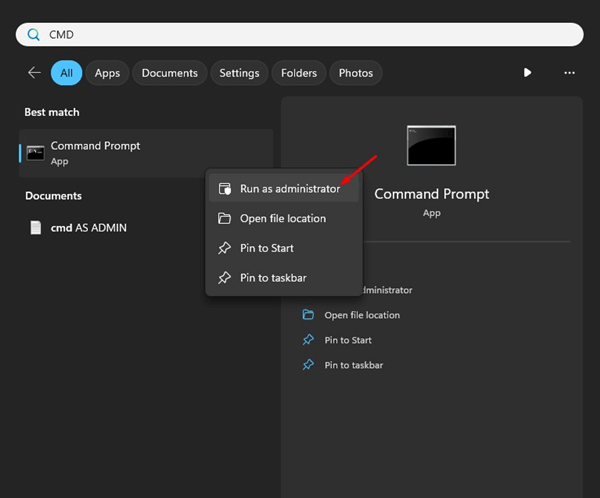
1. Type Command Prompt on the Windows Search. Right click on the Command Prompt and select Run as administrator.
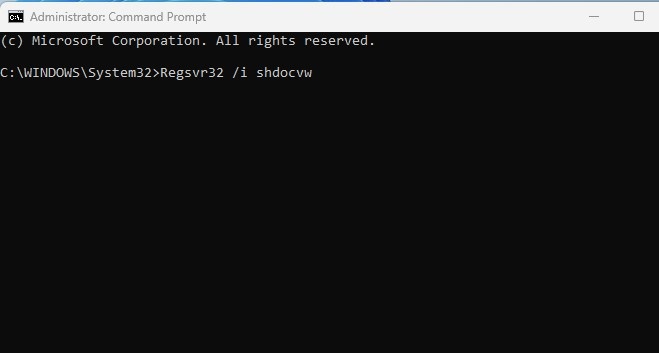
2. When the Command Prompt opens, execute the given command:
Regsvr32 /i shdocvw
That’s it! After executing the command, close the Command Prompt. Make sure to restart your computer to apply the changes.
You can change the Registry Editor to re-enable the navigation pane on Windows File Explorer. Here’s what you need to do.
1. Type Command Prompt on Windows Search. Right click on the Command Prompt & select Run as administrator.
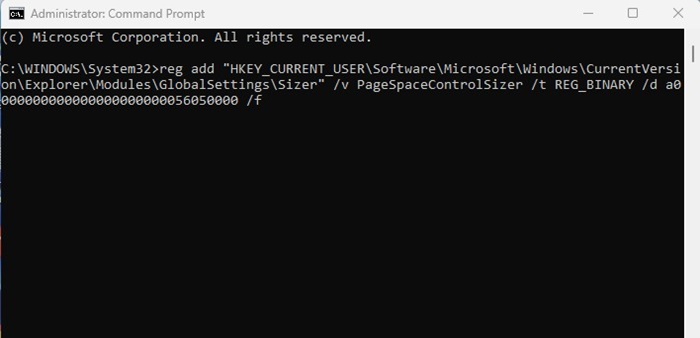
2. When the Command Prompt opens, execute the given command:
reg add "HKEY_CURRENT_USER\Software\Microsoft\Windows\CurrentVersion\Explorer\Modules\GlobalSettings\Sizer" /v PageSpaceControlSizer /t REG_BINARY /d a0000000000000000000000056050000 /f
3. After executing the command, close the Command Prompt.
That’s it! This is how you can fix the File Explorer Left Pane not showing on Windows problem.
7. Re-register the System Apps
If you don’t know, File Explorer is installed as a system app on Windows. You can re-register all system apps in one go using the PowerShell utility. Here’s how to re-register System apps on Windows.
1. Type PowerShell on Windows Search. Next, open the Windows PowerShell app from the list of best match results.

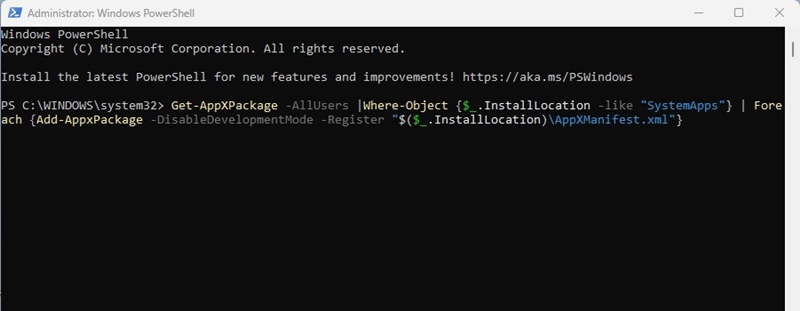
2. When the PowerShell opens, execute the given command:
Get-AppXPackage -AllUsers |Where-Object $_.InstallLocation -like "SystemApps" | Foreach Add-AppxPackage -DisableDevelopmentMode -Register "$($_.InstallLocation)\AppXManifest.xml"
That’s it! Now, you need to wait patiently until PowerShell Re-registers all system apps. Once done, restart your Windows PC.
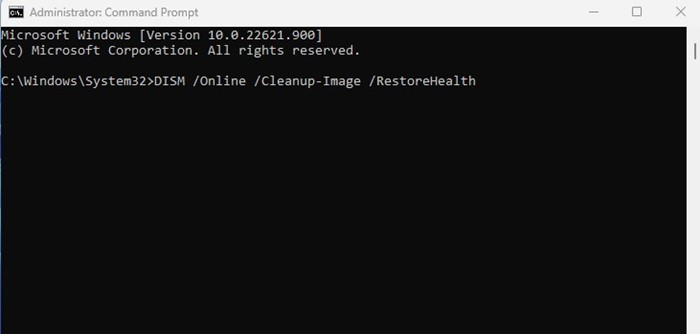
8. Run the SFC/DISM Command
Sometimes, the file explorer left pane can go missing due to corrupted system files. So, you need to run the SFC & DISM tool via the Command Prompt to restore all corrupted system files and fix File Explorer left pane missing problem.
1. Type in Command Prompt on Windows Search. Right click on the Command Prompt and select Run as administrator.
2. When the Command Prompt opens, execute the given command:
sfc /scannow

3. If the System File Checker utility returns with an error, execute this command:
DISM.exe /Online /Cleanup-image /Restorehealth
That’s it! After making the changes, close the Command Prompt & restart your PC. This will bring back the left pane on Windows File Explorer.
9. Uninstall the Recent Windows Update
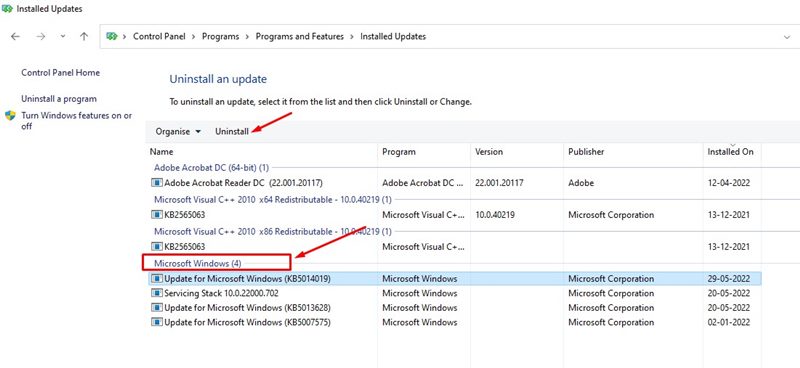
If the File Explorer left pane is missing after updating the operating system, you must roll back or uninstall the latest updates.
We have shared a detailed guide on how to rollback Windows. If you know which update conflicts with the File Explorer, follow our guide – How to uninstall Windows updates to uninstall that particular update.
10. Perform a System Restore
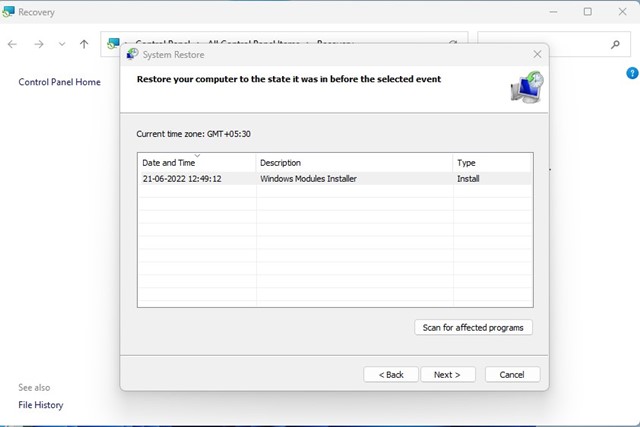
Performing a system restore is another best choice for resolving file explore left pane missing issue. However, you can only perform a system restore if the restore points are enabled on your PC.
If you already have a system restore point, follow our guide – How to Create Restore point to restore Windows to a state when the File Explore left pane is available.
11. Reset your PC
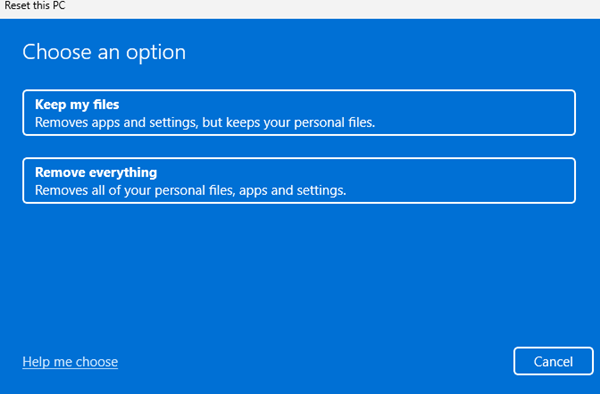
If nothing worked for you to resolve the file explorer left pane missing on the Windows issue, the last remaining option is resetting the PC.
You can factory reset your Windows 10/11 to wipe the existing Windows installation and reinstall the operating system with the latest updates.
The Reset tool of Windows will handle all things; you have to follow the on-screen instructions. Check our article – How to Reset Windows from the Settings, for a detailed guide.
So, this guide is about fixing File Explorer left pane missing in Windows 10/11. If you followed all methods, the issue was likely already fixed. Let us know which method worked for you to resolve the left pane missing in Windows.


