 for Windows 11/10")
You don’t really need a screenshot utility on the Windows operating system to capture a screenshot. The operating system ships with a few tools to capture a screenshot. On Windows, you can use the default Print Scr (Print Screen), Xbox Game Bar, or Snipping Tools to capture a screenshot.
Both Xbox Game Bar & Print Scr take a full-page screenshot, but if you have to capture a specific part of your screen, you must utilize the Snipping Tool. Snipping Tool is available on all versions of Windows, including the latest Windows 11.
What is a Snipping Tool?
The snipping tool is basically a screenshot utility that ships with the Windows operating system. The free screenshot tool for Windows provides various modes to capture a screenshot. Here are the types of snips you can capture with the Snipping Tool.
Free Form Snip: This mode allows you to draw a free-form shape around an object.
Rectangular Snip: When this mode is selected, you will have to drag the cursor around an object to form a rectangle.
Window Snip: When this mode is selected, you must select a window, like a dialog box, that you want to capture.
Full Screen Snip: This mode captures everything displayed on the screen.
Video Snip: This one captures a video clip of a rectangular selection of any part of the screen.
After selecting the capture mode, you will have to capture a snip. Once a snip is captured, it’s automatically copied to the Snipping Tool Window, where you can make changes, save, & share.
Download Snipping Tool for Windows Latest Version
If you are using the latest version of the Windows operating system, the Snipping Tool might already be available to you. You can access it from the Windows 11 search or by pressing the Windows + Shift + S button on your keyboard.
However, if there’s no Snipping Tool available on your PC, you need to download it from the Microsoft Store. Below, we have shared some of the best ways to download Snipping tool for Windows 11.
1) Download Snipping Tool from the Microsoft Store
In this method, we will use the Microsoft Store app to download the Snipping Tool. Here’s how to download Snipping tool for Windows 11 from the Microsoft Store app.
1. First, open the Microsoft Store app on your Windows PC.

2. When the Microsoft Store opens, search for Snipping Tool.

3. Now open the Snipping Tool app from the list of results.

4. If the Snipping Tool is unavailable on your computer, click the Get button. If it’s already installed, you will get the option to open it.

5. Now wait until Snipping Tool installs on your device.
That’s it! This is how you can download & install Snipping Tool on Windows from the Microsoft Store app.
2) Download Snipping Tool from the Google Drive
If you want to manually download & install the Snipping tool on your computer, it’s best to download the MSIX file shared on Google Drive and install it manually. Here’s what you need to do.
1. Launch your favorite web browser and visit this webpage.
2. When the Google Drive link opens, download the entire file.

3. Now, move back to the downloads folder. Find the MSIX file you’ve just downloaded & run it.

4. Now you will see the Install Snipping Tool? Prompt. Click on the Install button to continue. If the Snipping Tool is already available, you will see a different prompt asking you to Reinstall or Launch the application.

That’s it! This will immediately install Snipping Tool on your Windows PC.
Download the New Snipping tool for Windows 11
Microsoft recently released a new Snipping tool in its Dev & Canary Builds of Windows 11. You can download the new Snipping tool and use it straight away. Here’s how you can download the new Snipping tool for Windows 11.
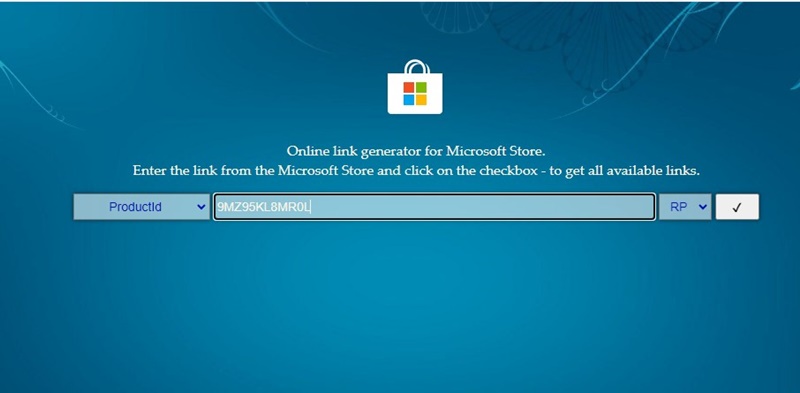
1. Open this webpage from your favorite web browser.
2. When the page opens, choose ProductID on the left drop-down. On the search field, paste 9MZ95KL8MR0L.
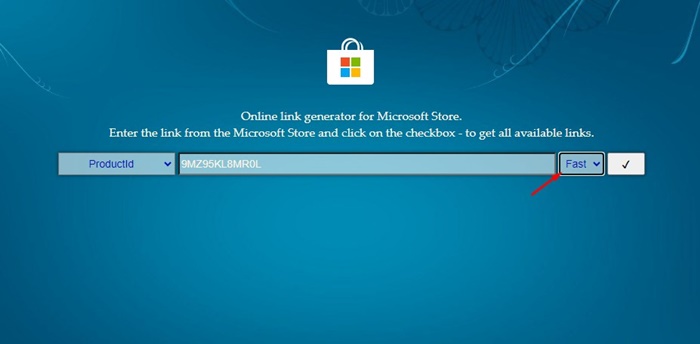
3. On the right drop-down, select Fast. Once done, click on the check mark button to search the ProductID.
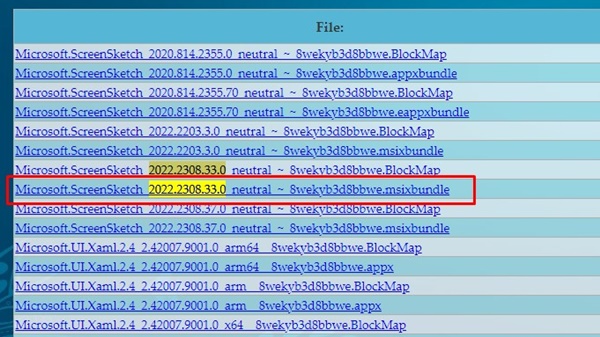
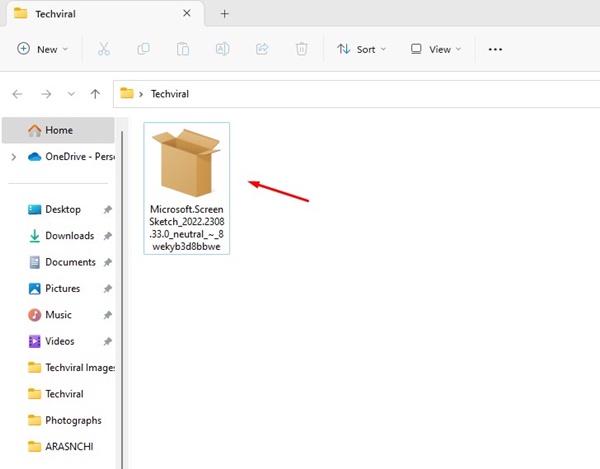
4. On the search result, find version 2022.2308.33.0 with the MSIXBUNDLE extension.
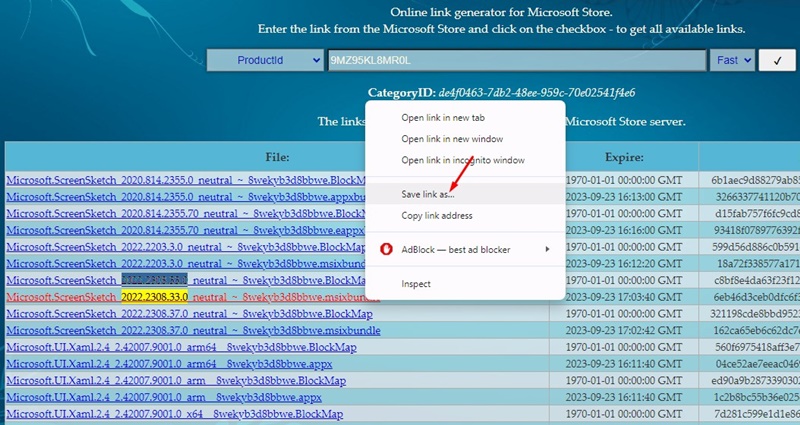
5. Right-click on the MSIXBUNDLE extension, right-click on it, and select Save Link As.
6. Once the file is downloaded, double-click on it to run it.
7. If Snipping Tool is previously available on your Windows 11, you will get the option to Update.
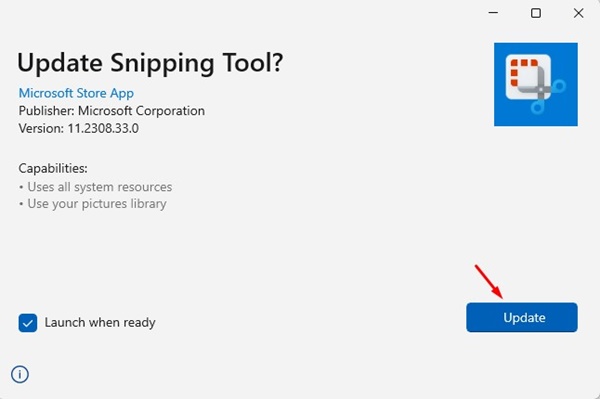
That’s it! The new Snipping Tool has a feature called Text Actions. The Text Actions lets you copy texts from a screenshot on Windows 11. If you need more details on how to copy text from an image, check our guide – How to Copy Text from screenshot in Windows 11.
How to Uninstall Snipping Tool?
If, for any reason, you don’t want to use the Snipping tool utility, you can uninstall it easily. Here’s how to uninstall the Snipping Tool on Windows 11.
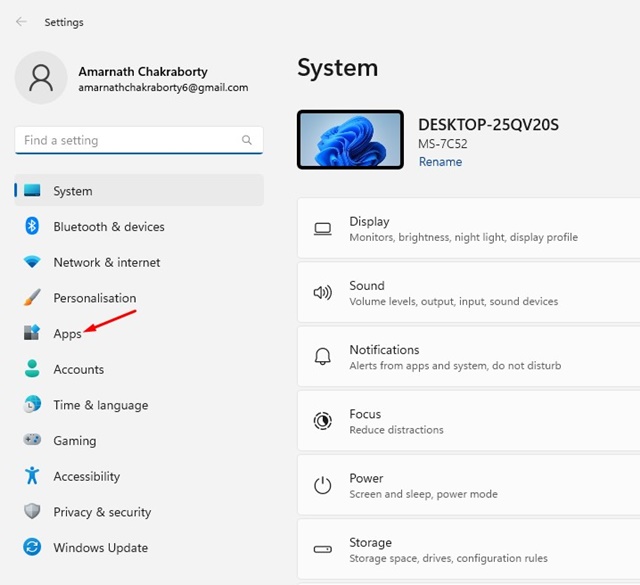
1. Open the Settings app on your PC & switch to the Apps section.
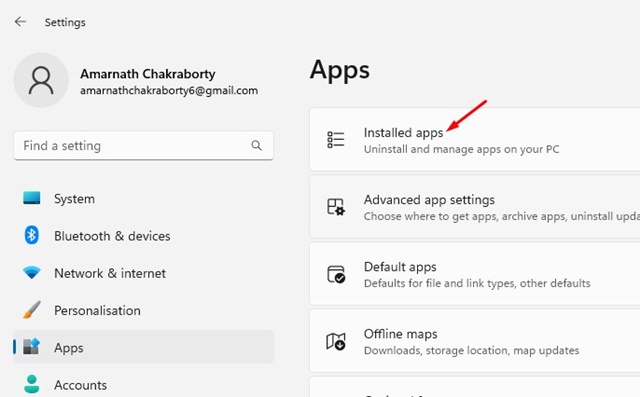
2. On the right side, click on the Installed Apps.
3. Now, search for Snipping Tool.

4. Right-click on the three dots next to Snipping Tool.

5. On the menu that appears, select Uninstall.

6. Once again, click on the Uninstall button.

That’s it! This is how you can uninstall the Snipping Tool from your Windows computer.
So, this guide is all about how to download the Snipping Tool for Windows. We have shared all working methods to download the free screenshot utility – Snipping Tool for Windows 10/11 computers. Let us know if you need help understanding certain Snipping Tool features.


