
Windows 10 allows you to quickly capture the screen by simultaneously pressing Windows logo + PrtSc (Print Screen) keys. The captured screenshot is automatically saved to the Pictures > Screenshots folder.
We have seen many users complaining that Windows 10 doesn’t automatically save the captured screenshot in the Pictures > Screenshots folder.

If you are also experiencing this issue, the given below solutions should help you fix the issue.
Solution 1 of 3
Check if Windows 10 saving screenshots to OneDrive
If you are using a Microsoft account to sign in to Windows 10 or using OneDrive on your Windows 10 PC, you should check if Windows 10 is automatically saving screenshots to your OneDrive account. Although Windows 10 displays a “The screenshot was added to your OneDrive” desktop notification upon saving the screenshot to your OneDrive (unless you have turned off the notification), we suggest you check OneDrive settings.
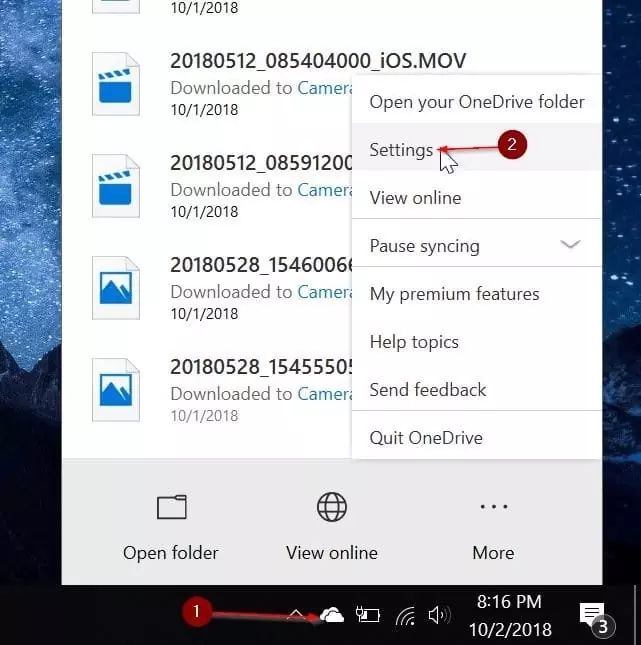
Step 1: Right-click on the OneDrive icon in the system tray, click More and then click Settings.
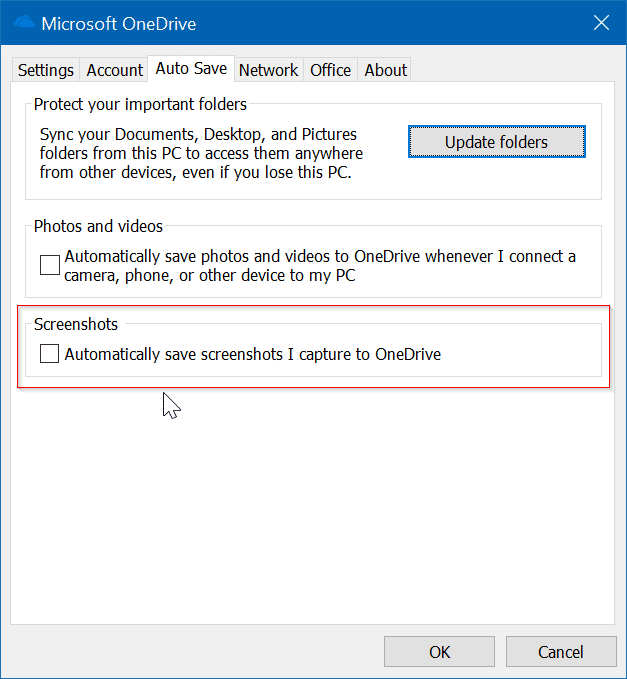
Step 2: Navigate to the AutoSave tab. Make sure that Automatically save screenshots I capture to OneDrive option is NOT selected. If selected, unselect it and then click OK button.
Solution 2 of 3
Check where Windows 10 is saving screenshots
If the screen is dimming for a moment when you press Windows logo + Print Screen but not saving the screenshot in the Screenshots folder, you can easily check where the screenshot is being saved. Here is how:
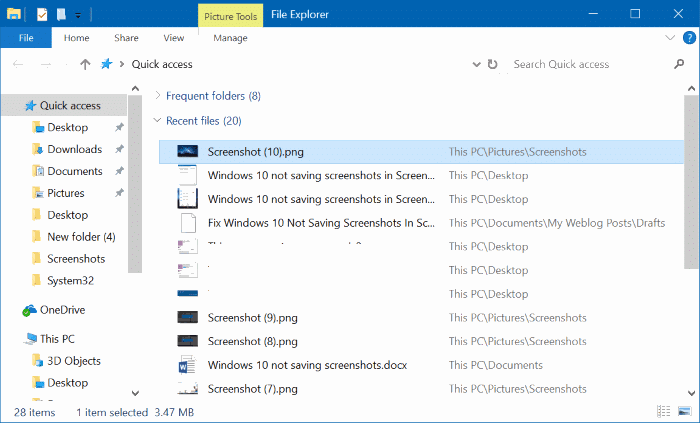
Step 1: Open the Quick Access in File Explorer.
Step 2: In the Recent files section, the file at the top of the list is the recently taken screenshot (with the same name). Right-click on the file and then click the Open file location option to open its original location.
Solution 3 of 3
Check permissions for the Screenshots folder
If the Screenshot folder doesn’t have the write permission, Windows 10 might not be able to save in that folder. Here is how to check and alter permissions.
Step 1: Right-click on the Screenshots folder and then click Properties to open the Properties dialog.
Step 2: In the Security tab, click on the Edit button. Make sure the system account has “Full control.”
If these solutions didn’t help you resolve the issue, try resetting Windows 10 to default settings without data loss or reinstall Windows 10 without data loss.
Let us know which solution fixed your issue!


