")
Windows 11 updates are important, and they are released quite often. If you are using a Beta or Dev Builds of Windows 11, you shouldn’t miss any updates as they mostly contain bug fixes and new features.
However, the problem that Windows 11 users are facing now is ‘Updates Not Downloading’. Several Windows 11 users have reported that Windows 11 updates not downloading on their computers.
So, if you are a Windows 11 user dealing with the same problem, continue reading the article. Below, we have shared a few best ways to fix Windows 11 updates not downloading or installing issues.
Why is Windows 11 Update Not Downloading?
Windows 11 update issues are usually linked to internet connectivity and problematic system files. A few other things can trigger Windows 11 update problems as well.
We have listed some major reasons for the Windows 11 update not downloading.
- Bug or Glitch
- Your Internet is not working.
- Windows System Files are corrupted.
- Windows Services are disabled.
- You are using VPN/Proxy Server.
- Less Storage Space.
These major reasons lead to Windows 11 updates not downloading or installing.
How to Fix Windows 11 Updates Not Downloading Issue?
Now that you know all possible reasons for Windows 11 Updates Not downloading, you can troubleshoot the issue more effectively. Here’s how to fix Windows 11 Updates Not Installing issue.
1. Restart your Windows 11 Computer
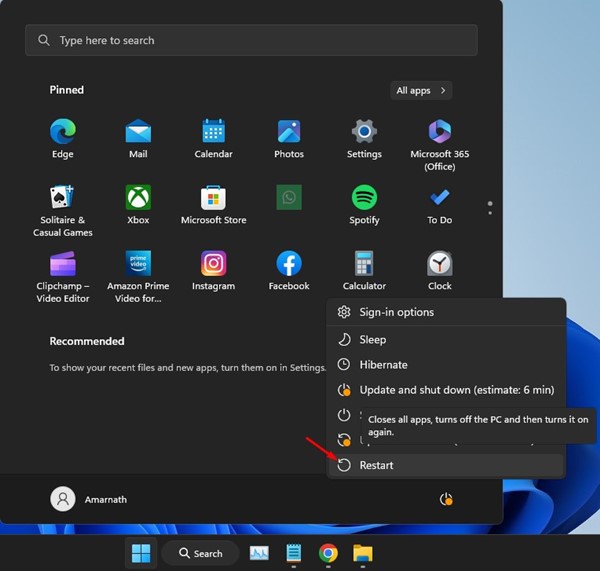
If you haven’t restarted your Windows 11 device for a while, it’s the perfect time to restart. Restarting will rule out the bugs and glitches preventing the Windows Update service from running.
Restarting the computer is the best way to eliminate temporary glitches and bugs. It will also refresh the memory and will restart the Windows Update Services.
So, click the Windows 11 Start Button, Power Menu, and select ‘Restart’. After the Restart, run the Windows Update again.
2. Check Your Internet Connection
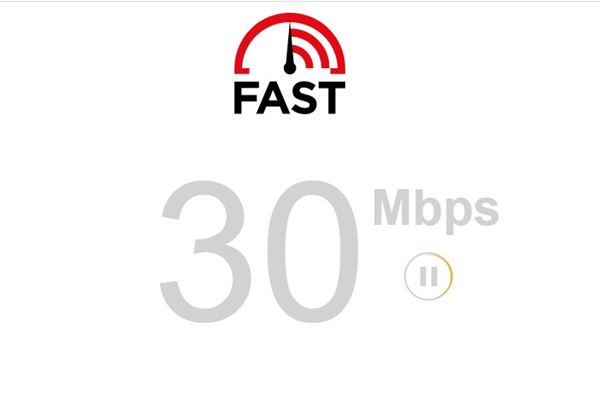
Well, an internet connection is required for downloading Windows Update. If your internet is unstable, the Windows Update tool will face problems while downloading the files from its servers.
So, if Windows 11 updates are not downloading on your device, you need to check for internet issues. You can use any speed test websites to determine your internet speed and stability.
3. Run the Windows Update Troubleshooter
Microsoft’s Windows 11 has an Update troubleshooter that scans and fixes every Windows Update service-related problem. You can run it to fix Windows 11 updates not downloading.
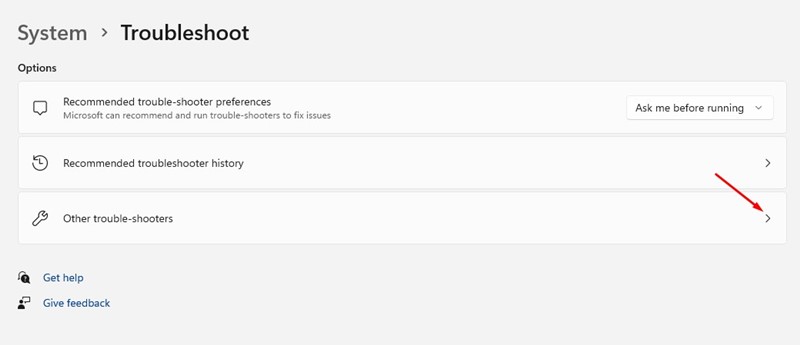
1. Click on Windows 11 Start Menu and select ‘Settings‘.
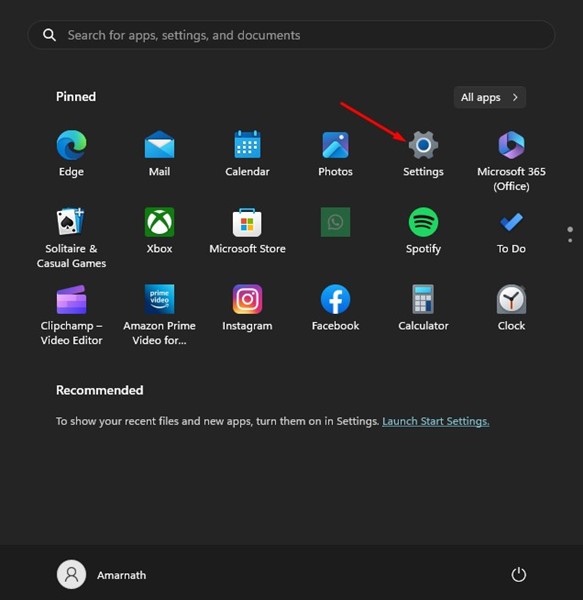
2. On Settings, switch to the System tab. On the right side, select ‘Troubleshoot‘.
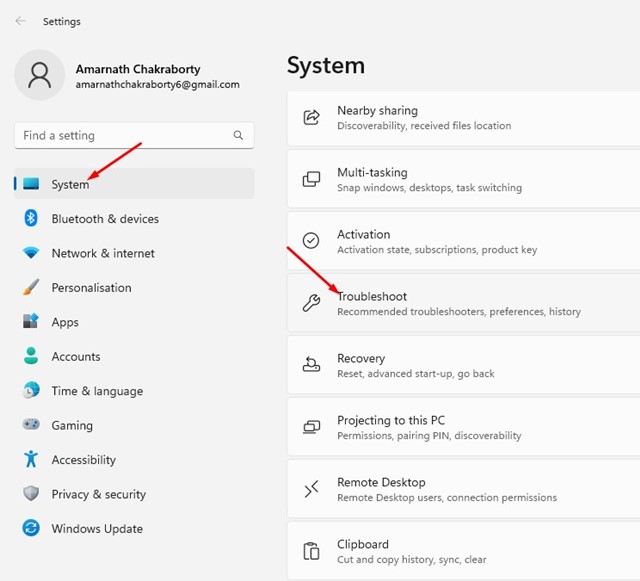
3. Next, on the Troubleshoot, click on the ‘Other troubleshooters‘
4. On the Other Troubleshooters, click the ‘Run‘ button beside the Windows Update.
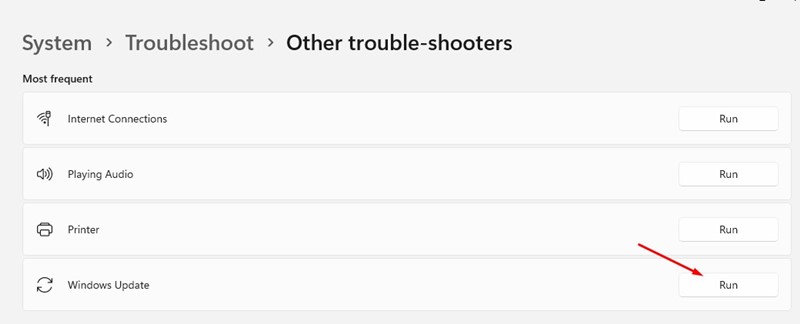
That’s it! This will run the Windows Update Troubleshooter. You need to follow the on-screen instructions to complete the troubleshooting process.
4. Enable the Windows Update Services
Malicious apps can sometimes turn off the Windows Update services. When the Windows Updater services are disabled, Windows 11 won’t check for updates.
Even if you manually run the Windows Update tool, it will fail to download the updates. So, you must ensure that the Windows Update Services are enabled and running.
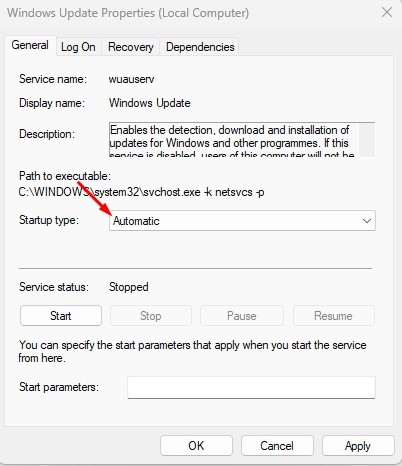
1. Press Windows Key + R to open the RUN dialog box. On the RUN dialog box, type services.msc and hit the Enter button.
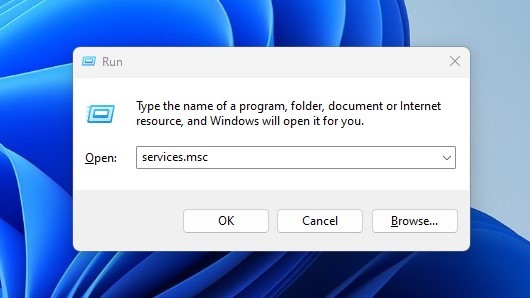
2. This will open the Services App. You need to find and double-click on the ‘Windows Update‘ service.
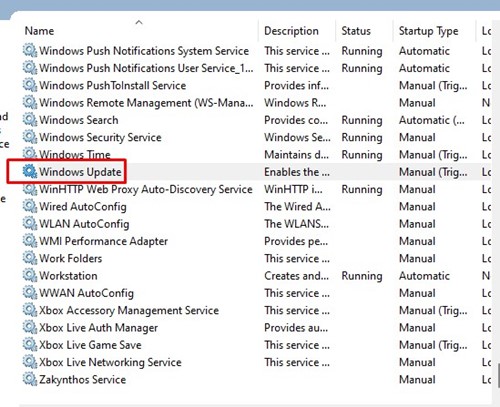
3. On the Windows Update Properties, select ‘Automatic‘ on the Startup type drop-down and click the ‘Apply‘ button.
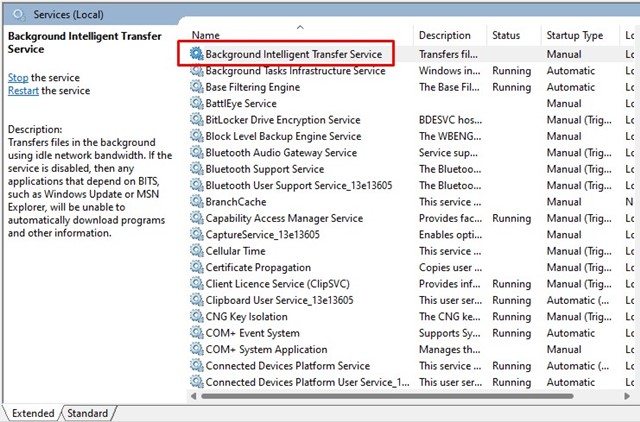
4. Now, find and double click on the ‘Background Intelligent Transfer Service‘.
5. Next, on the Background Intelligent Transfer Service Properties, select ‘Automatic‘ on the Startup type and click the Apply button.
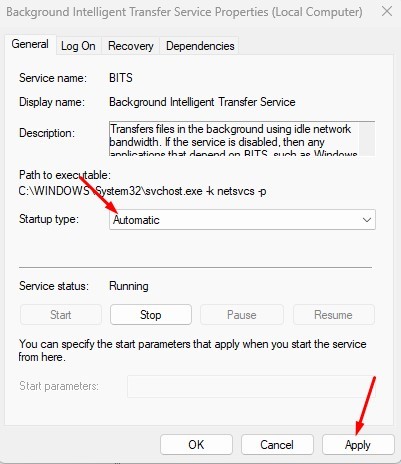
That’s it! After making the changes, restart your Windows computer.
5. Check Your Storage Space
Windows updates are often huge, and it’s recommended to have at least 20GB of free storage space to install the updates smoothly.
If you can download the updates but are getting errors while installing them, you need to check the storage space.
Windows may fail to download or install the system updates if you have limited storage space. So, free up the storage space before downloading the Windows updates.
6. Disable Metered Connection
You may have set the WiFi as the metered connection. When you set any network as Metered connection, you reduce data consumption. To reserve the WiFi data, Windows may stop searching for the available updates.
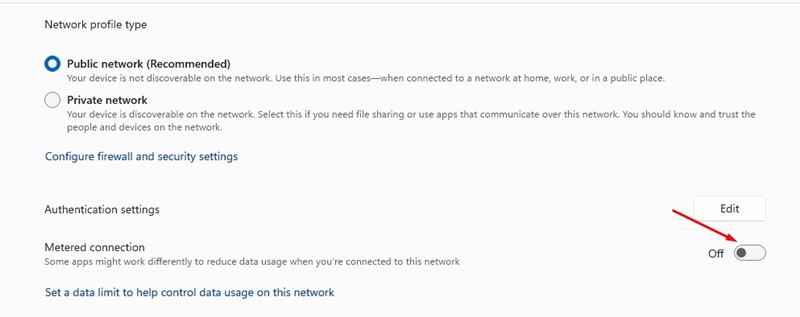
- You can fix the problem by disabling the metered connection. Here’s how to do it.
- Open Settings and switch to the Network & internet.
- On the right side, click on the WiFi/Ethernet.
- Next, select your connected WiFi/Ethernet and turn off the ‘Metered Connection‘.
That’s it! This is how you can turn off metered connection on Windows 11 computer.
7. Delete Update Files from SoftwareDistribution Folder
SoftwareDistribution is a folder where Windows 11 stores all update files. Update files are stored in this folder and automatically installed on your set time and date.
If Windows 11 is not downloading or installing an update, you can try deleting the existing update from this folder to resolve the problem. Here’s what you need to do.
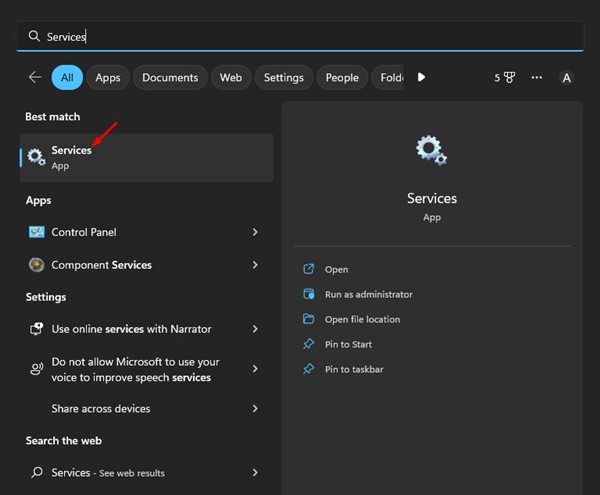
1. First, click on Windows 11 search and type in Services. Next, open the Services app from the list.
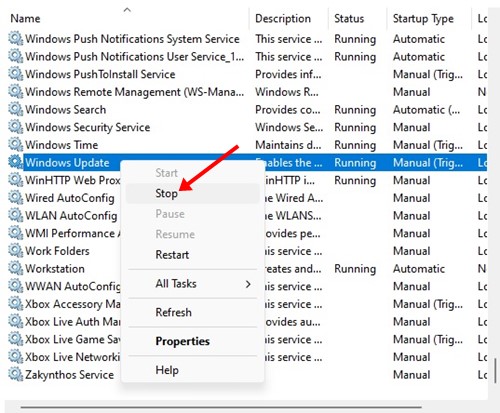
2. On the Services, right-click the Windows Update and select ‘Stop‘.
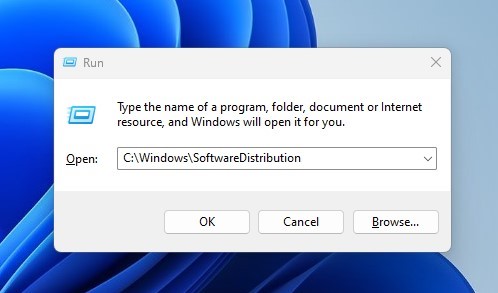
3. Now open the RUN dialog box (Windows Key + R), type the following path, and press Enter.
C:\Windows\SoftwareDistribution
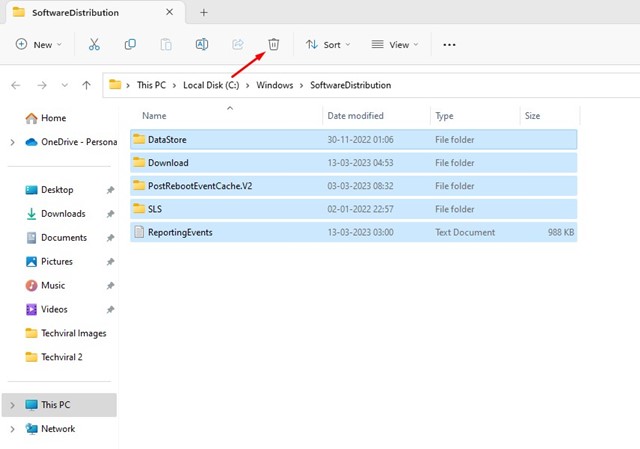
4. This will open the SoftwareDistribution folder.
5. Right-click on all files and select ‘Delete‘
6. Now open Services again, right-click on the Windows Update, and select ‘Start‘.
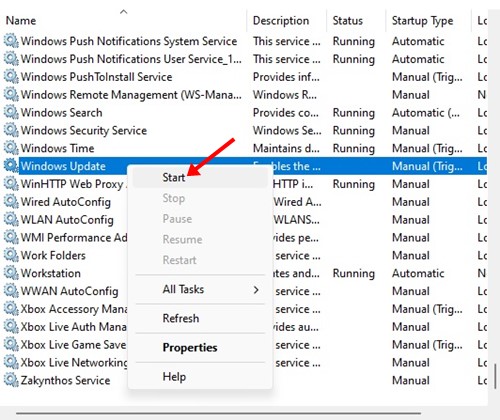
That’s it! After making the changes, make sure to restart your computer.
8. Run the System File Checker
System File Checker utility is designed to find and fix corrupted system files. It’s useful and easily fixes Windows 11 Updates Not Installing problems. Here’s what you need to do.
1. Click on Windows 11 search and type CMD. Right-click on the Command Prompt and select ‘Run as administrator’.
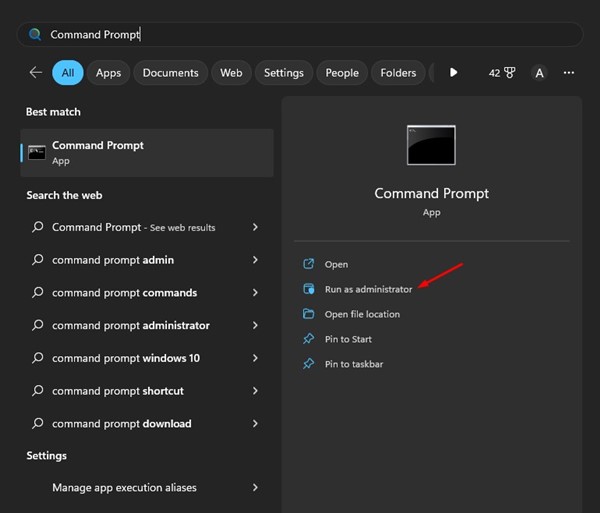
2. When the Command Prompt opens, paste the command and press Enter.
SFC /scannow

That’s it! This will run the System File Checker utility on your computer. You need to wait patiently for the scan to complete.
These are a few simple methods to fix Windows 11 updates not downloading or installing problems. We are sure these methods will help you install all Windows 11 updates easily. If the methods didn’t help you, you can raise a question on Microsoft Forum or roll back your OS version.
Also read: Windows 11 ISO Free Download Full Version
If you need more help resolving Windows 11 update issues, let us know in the comments below. Also, if the article helped you, make sure to share it with your friends.

")
